There is an update to this post on the hinge issue of the pocket rig. You can read it by clicking here.
 |
| The Edelkrone Pocket Rig. |
Although this is a VFX blog I also like to talk about film equipment. Especially when it is the cheaper kind for the Indie film makers. Edelkrone is a Turkish company and has come out with some nice new rigs and the Pocket Rig is definitely a new concept in the world of camera rigs.
I have been looking for a DSLR shoulder rig for quite some time now and when I saw the demo video for the Pocket Rig I was immediately enthusiast about it's size and portability. You can easily order the Pocket Rig from the Edelkrone online shop and currently it sells for $299. I also ordered the handles which are $149 and fit perfectly on the bars of the rig. It is delivered by DHL and when the items are in stock your order will arrive in two days (when living in Europe). Take notice that these prices are without taxes and VAT. Expect to get a bill from DHL. Belgium for example ads 21% VAT.
 |
| The box and its contents. |
 |
| The extra handles. |
The box of the Pocket Rig is made of sturdy carton board and contains foam to protect the rig during transport. It holds the rig in its collapsed form and an allen key but no manual. Then again, when you have watched the demo movie from Edelkrone once, it is not hard to figure out how it works. The extra handles came disassembled in bubble wrap and are easy to assemble.
The Pocket Rig is made out of black machined aluminum. Whit its 550g (or 1.2lb) it is not very heavy but it does add 30% extra weight to your DSLR which is definitely noticeable. In its collapsed state it is not much bigger than a battery grip. There are some rubber pads on top which prevent the rig from sliding around when it is attached to the camera and protects the camera from scratches. The screw for attaching the camera sticks a bit out and is attached to a big wheel which sticks out on the front and the back. This makes it quite convenient to screw the rig to a DSLR. I also tried to screw it to a Panasonic HVX 200 which is quite a bit bigger than a DSLR and it did work nicely.
 |
| The stock folded out. |
It is easy to unfold the stock and fins which are hidden under the base plate. The fins can be used to push the rig against your shoulder or it is possible to use them as a clip on a belt when you need to shoot from the hip. The stock itself is a bit longer than 10 cm (4 inches) but can be extended to 30 cm (a foot) with two screws. This way it is possible to watch your DSLR display directly or to attach a viewfinder which you can press to your eye.
 |
| Unfolded rods. |
There are two folded industry standard 15mm rods underneath the stock. These rotate on a hinge and can be locked into the forward position with a ball bearing locking system. It is possible to mount an extra handle and a follow focus from any brand at the same time on these rods but they do seem a bit short to add a complete matte box system on them though.
Under the rods there is an extra plate with a hole which can be used to attach the rig to a tripod. Together with the rods and the follow focus it becomes a very powerful combination which usually only more expensive rigs have at their disposal.
 |
| The Pocket Rig with screwed on handles. |
I did get some extra handles as mentioned above. These are also made out of machined aluminum and have good rubber grips. They can slide along the rods and each handle can rotate a full 360 degrees so it is highly adjustable. I noticed that the handling of the whole rig becomes more stable with these handles.
My opinion on the Pocket Rig
I had the Pocket Rig with handles trough a test run when shooting for a project with my Nikon D7000 and had also other people have a go with the rig.
I applaud it's extreme portability. It is indeed very small and easy to stow away in a regular backpack. Although the weight is noticeable it is light enough in comparison to the rest of the kit and it does add a bit of stability to the whole. Since it is made out of thick aluminum it is also very sturdy and can withstand bad handling quite well although I do recommend to be careful as the camera on top will not like such treatment at all.
 |
| The whole rig with a camera attached to it. |
The rods are absolutely great. This is what makes the Pocket Rig stand out. When not needed they fold away very neatly and are hardly noticeable but folded out they add great functionality. Handles or a follow focus are the obvious add-ons but there are more options like a monitor or even a matte box. Do mind that they are not very long so if you got a big lens like the picture above then the matte box is probably a no go. It possible to unscrew them to add longer rods instead but then it defeats its portability feature.
There is one feature missing in my opinion. The hinge of the stock is on the right hand side which means that when you press the rig hard against your shoulder it has the tendency to collapse to the left. Something like a ball bearing locking system as the rods have would have been convenient. Time management is essential on a shoot and you don't want to redo a perfect take because the rig just collapsed at the wrong time. It doesn't mean the rig becomes unusable but you do need some training to get used to it, then again all rigs need some training anyway.
Conclusion
I think this is a great product and although it is not the cheapest it is reasonably priced. Just a pity that the hinge has no locking system as that would make it perfect.
Update on the hinge (10 March 2012)
My biggest issue with the Pocket Rig is that the hinge is a bit loose and it that it has the tendency to collapse when firmly pushed against the shoulder. While posting this blog in a pocket rig thread on the dvxuser.com forum it came to my attention (thanks to Nick_K for spotting this) that there is a solution to this problem.
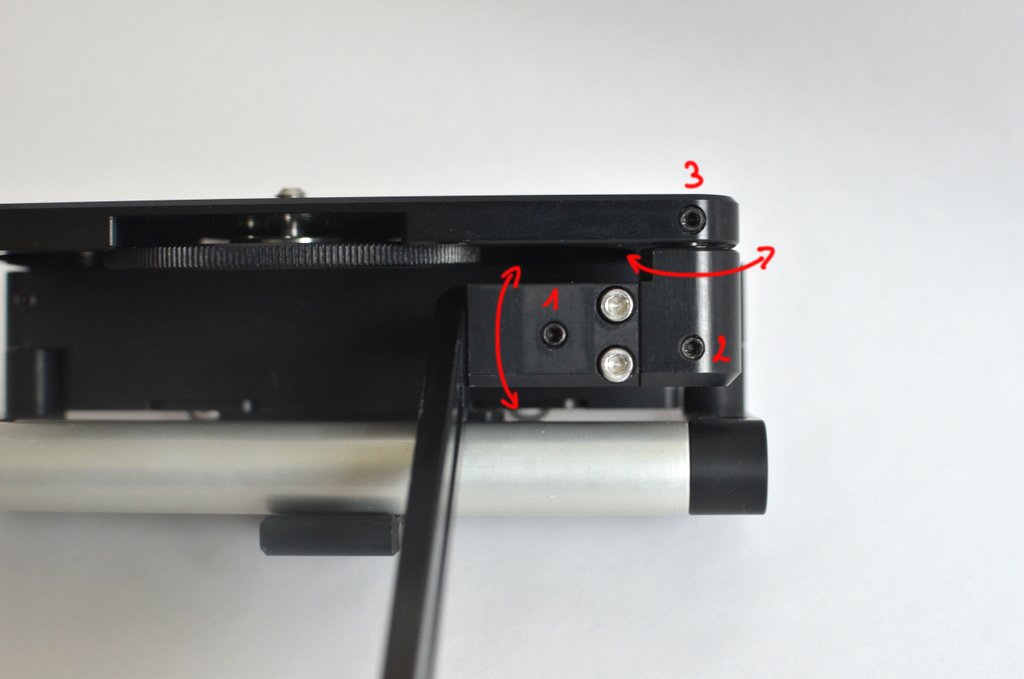 | |
| Three screws to adjust the hinges |
In the picture above you can see three black screws of which two of them solve more or less my problem. The hinges become much harder to move when tightening these screws. Screw 1 is responsible for the vertical rotation. Screw 2 is used for the horizontal rotation. Out of the box screw 3 was already tightened and is not needed to control the rotations. The allen key for tightening the screws is provided as you can see in one of the pictures above.
Although I am happy that there is a remedy I have two remarks on this issue. The screws are in logical positions so you can figure it out by yourself but I have the tendency not to experiment too much by unscrewing things. It would have been great if there was a little manual or at least a link to an online pdf file to explain this. The second remark is that when you tighten the screws too much it becomes harder to fold the whole rig so it is important to find a good balance there.
If you ordered your rig before 01/01/2012 it is likely you will not have this option. The good news is that Edelkrone will send you a free upgrade piece. Check this link to order it: Pocket Rig upgrade
Links:
The Edelkrone website
The Pocket Rig on Vimeo
You can subscribe at the top or follow me on twitter (at the right hand side of the screen) for the latest news on this blog.


